My setups along the way. At this point, I have cycled through a lot of equipment and only have the first two setups.

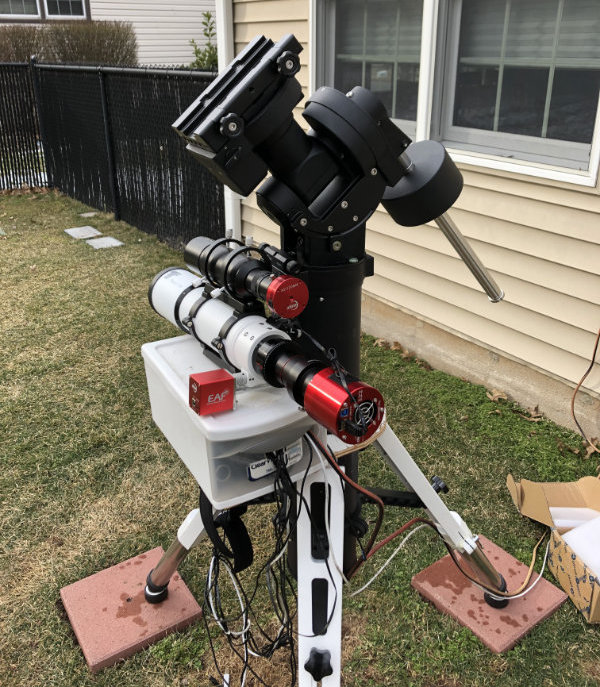
Galaxy setup: TS Optics 130, ZWO ASI2600 on CEM70 mount; Svbony 60mm scope and Asi120mm for guiding.

Widefield setup: TS Optics 80, ZWO ASI533 on CEM70 mount; Orion 60mm scope and Asi120mm for guiding.

My first APO setup: TS Optics 80, ZWO ASI533 on Sirius EQ-G mount; Orion 60mm scope and Asi120mm for guiding.

My first astrophotography setup: Orion ST120 achro, Canon 1000D on Sirius EQ-G Tracking/GoTo mount.

The Orion ST120 on small equatorial mount. Got this when I restarted astro in 2017. This is not GoTo so you have to find DSO manually.

The Orion XT10 with Intelliscope. The monster! My brother called this the human catapult. Got this after the XT8

My first scope: Orion SkyQuest XT8, a classic DOB. It is a great starter scope: highly recommended.
The astrophotography setup is much more complex than I imagined. Some pieces are obvious (telescope, camera) but it turns out that just gets your first snapshot... and it takes a lot of equipment to get from that first snapshot that looks crappy to something you would actually show other astro folks.
Here is some info on the pieces of my setup.
Mount
The mantra in AP is that the three most important pieces of equipment are the mount, the mount, and the mount! Seriously, the most consistent recommendation is to get the best mount you can afford. After doing this for a bit, you realize that it does make a difference, as the mount is what keeps the telescope exactly trained on the object you are trying to image. To do this, it is actually rotating to match the rotation of the earth and it needs to do this pretty precisely. (For reference, if you do not have a tracking mount, with my telescope you start seeing star trails in under 2s).
My first real mount was the Orion Sirius/HEQ5 mount which I got in November 2020. It is near the bottom of what is required for AP but still decent for the smaller telescopes. In retrospect, I definitely should have paid a bit more and gotten the one grade up of Orion Atlas. But it was fine for my setup and served me well. Eventually, though, I was looking for something that could support heavier telescopes. In Februrary 2022, I bought what is considered a good mid-level mount, the iOptron CEM70. This is big enough to mount not just small refractors but also larger refractors and SCTs. While one of the advantages of this mount is that it is relatively lightweight (when in separate pieces), it is still too much of a pain so the mount mostly stays outside under a weatherproof cover.
Buying the CEM70 was not all roses. Now it is all ok but I had buyers remorse immediately after buying it because I had a slew of software control problems and horrible gear backlash. Making it worse was terrible support from the manufacturer. Eventually though, I worked through all the problems and it is now quite stable and reliable. But I still occasionally read horror stories of some new owners fighting through the problems, and I feel their pain.
Telescope (widefield)

My widefield telescope now is the TS Optics Photoline 80mm. Getting this scope to replace my Orion ST120 achromat was, unfortunately, a long saga. First, the scope was backordered for 4 months. Then, when it arrived in April 2021, I noticed problems with stars in the image. I tried to fix based on instructions from the vendor but while that helped with the original problem, it caused a different problem that required me to ship the scope back to Germany for repair. It then took another 2 months to get it back. In the end, I am happy with my scope, and it was significantly cheaper than my first choice.
The TS80 is an FPL53 triplet apochromatic. This is actually a generic scope design with many different brands selling a version of it. The TS Optics brand is from Teleskop-Express in Germany. The FPL53 in my version indicates the type of glass for the objective: this is considered the top end with highly desirable diffraction characteristics. The triplet denotes that it actually has 3 lenses which allows it to bring all three primary colors (red, green, blue) into focus simultaneously to a single plane. In theory at least, this should result in pin-point stars compared to the blue-halo'd blobs I had with my achromat. Additionally, I have the TS frame flattener which improves the shapes of the stars towards the edges of the frame.
Telescope (galaxy)

I bought a large refractor telescope, the TS Optics Photoline 130mm, as a galaxy scope in December 2022. My TS80 is so easy to use and gives quite good pictures but it is a widefield scope and just can't do tiny galaxies. I originally thought about going the traditional route of a SCT type scope. These are reflectors (uses a mirror instead of lens) and are affordable up to quite large apertures and focal lengths. A combination of availability issues, the unknown of dealing with new issues associated with reflectors, and the inability to really use the extra capabilities of the large aperature in the bad NJ skies led to a change of direction.
The TS130 is an FPL53 triplet apochromatic. It is essentially the big brother of my TS80 (smaller scope in picture). Getting it here was a massive pain, same as the other one. It is sold from Germany and I spent weeks trying to get FedEx to pass it through customs. Then FedEx misclassified it costing me extra money in customs duties. I keep saying that I won't do this again, but the TS scopes are really well priced compared to anything directly available in the USA. And at this point I know what the strong and weak points of the scope are so I am comfortable with it. Hopefully it will turn out to be a good decision in the end.
Camera
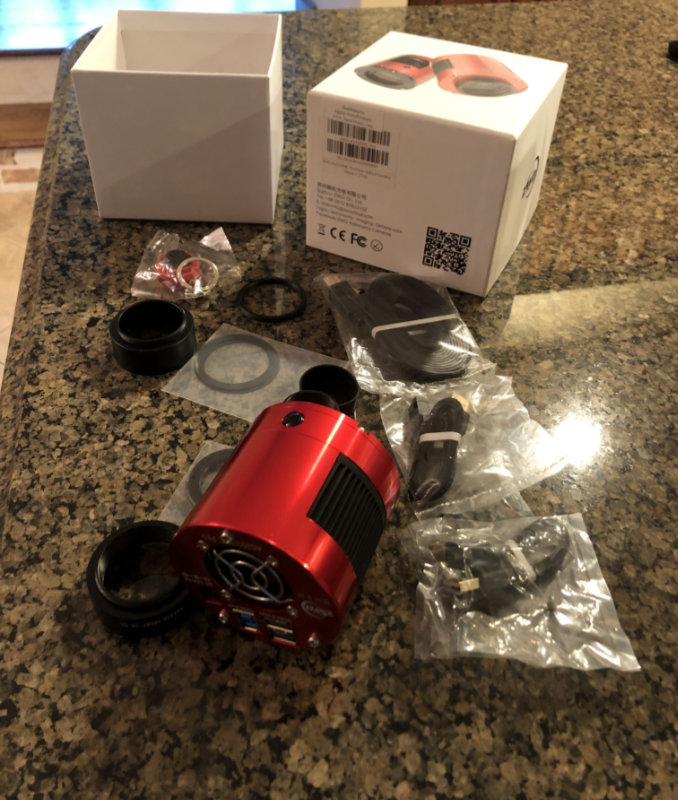
For the first several months, I just re-used my Canon 1000D DSLR as my imaging camera. This was fine and I was happy with the pictures, but in June 2021, I upgraded to an astro-camera, the ZWO ASI533MC-Pro. This camera is "cooled" which means that it has a cooler (TEC) that is able to maintain the sensor at a stable (low) temperature. There are several advantages to this over the DSLR. For one, the amount of read-noise is dramatically lower. Second, since it can be set to a specific temperature, you can exactly match the temperature for the dark frames which results in superior image callibration. And finally, since this is a astro-specific camera, it is sensitive to the Ha wavelength common in certain emission nebula. This should produce far better pictures of these types of targets.
There were a couple of downsides with the ASI533 camera though. First, it is a smaller sensor than the DSLR. The Canon sensor is a APS-C size which is quite big and covers most of the field of view of my scope. The IMX533 sensor in the ASI533 is significantly smaller so it cannot fit some of the larger targets such as Andromeda Galaxy. The second disadvantage, in my eyes at least, is that it is a square sensor. While this is a actually good thing for framing targets, it looks incongruous in that we *expect* to see rectangular images.
In November 2022, I got the best of both worlds (by spending more money). I upgraded to the ASI2600MC. This is effectively a cooled astro camera but with a sensor that is the same APS-C size as a DSLR. It therefore has all the advantages of a cooled astro camera but with the large field of video that I enjoyed with my DSLR. This allows me to capture some larger targets without doing mosaics. Initially I had thought that mosaics wouldn't be that difficult but I since figured out that they are near impossible in NJ because there are so few nights that one can capture images, and a 4 panel mosaic to roughly equal the ASI2600 FOV requires 4 times the imaging time.
Guiding Scope & Camera (Widefield)

This is my set up of guide scope (Orion 60mm) and guide camera (ASI120mm) on my widefield setup. Despite what I said about the mount doing the tracking, the mount itself has tracking error which will typically make exposures over 30s (depends on some other parameters but about this for me) impossible. The guide scope/camera is controlled by some guiding software (Phd2 in my case) to correct errors in tracking and allow longer exposure times without blurring.
The basic idea behind guiding is simple, but the fact that it all works is amazing. Essentially, the idea is that stars are not supposed to move. So if the guiding system is taking pictures of stars, and the stars move, then the tracking must be off and needs to be corrected. The mount moves in two axes, the right ascension (RA) and the declination (DEC) axis. The guiding system takes a periodic exposure (every 2s in my setup), calculates the error in RA and DEC based on how far the star "moved", then sends an RA and DEC correction pulse to the mount. The end result is that my mount now tracks to less than 1 arc-sec total error. Since each degree is 60 arc minutes, and each arc minute is 60 arc secs, the end result is that my setup points my telscope in the sky to a precise location with an error no more than 0.0003 degree!
Guiding Scope & Camera (Galaxy)
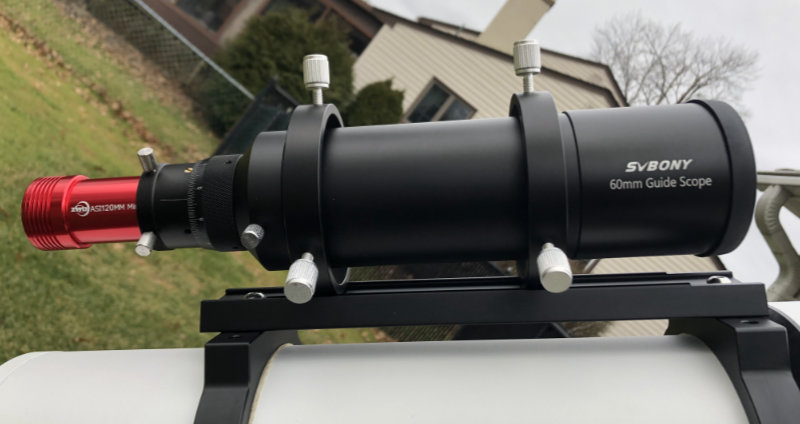
My guiding setup for my widefield worked so well, I basically replicated it for my galaxy setup. Since I bought the Orion 60mm guide scope, I figured out it was literally the same scope as the SvBony 60mm scope, just rebranded. So I opted for the cheaper SvBony this time. Also, the asi120mm comes in a "mini" version which works in more configurations than the "planetary" asi120mm, so even though I technically don't need it, I opted for the mini.
I should mention that this guiding setup is not typical for galaxy setups. Typically, an SCT is used for galaxy imaging. Mirrors exhibit a phenomenon called "mirror flop" that generally requires a different approach to guiding called Off-Axis guiding wherein a portion of the image from the main telescope (instead of from a separate guide scope) is redirected via a prism to the guiding camera. This ensures that there is no discrepancy between what is happening in the actual image path versus what the guide camera is using. Fortunately for me, with a large refractor setup for my galaxy imaging, the OAG setup is not as critical.
Capture Software
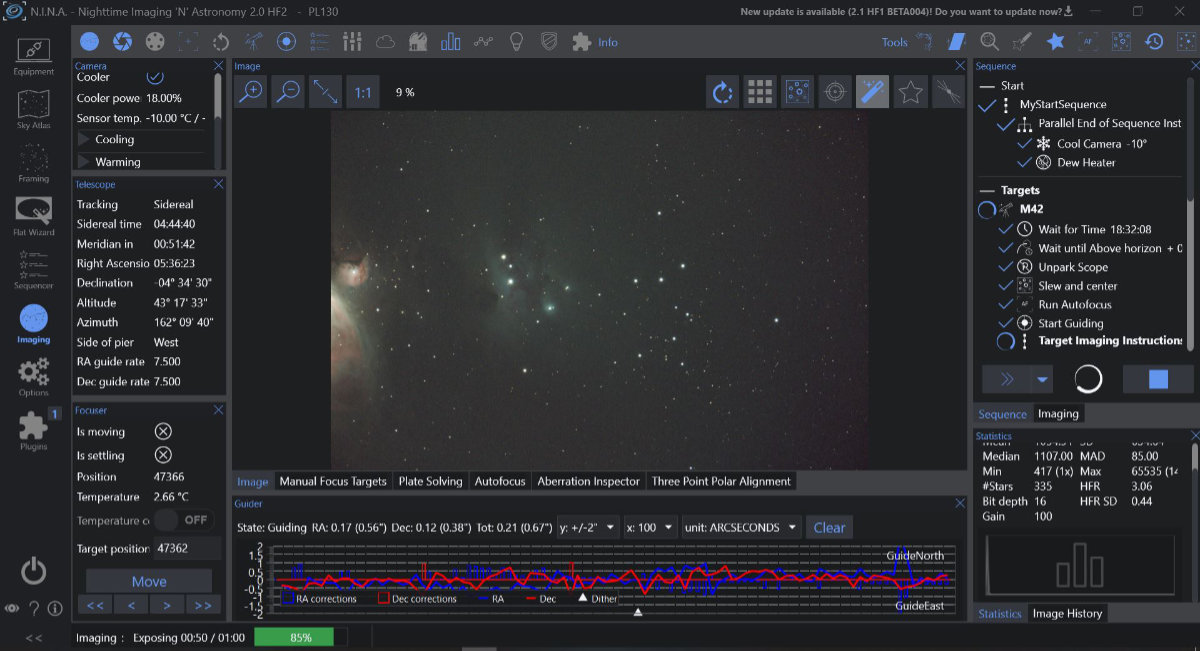
For image capture, I have used NINA since early 2021. This excellent open source software handles all aspects of capture process which includes controlling the mount, the camera, the guiding, everything. Much of this is done by underlying external tools but it provides an nice, clean integration on top of it all. It is a remarkable bit of software that is as full featured and stable as the paid alternatives. This might appear to be a minor aspect of imaging because, frankly, one could manually position everything and take the pictures. However, I am lazy and significantly reducing the friction involves automating as much of this. For this, NINA with the new advanced scheduler shines for me. All my equipment is supported and it effectively supports all the types of operations I use. This gets quite complicated at times. As an example, my standard sequence involves waiting until time and when target is above my customized horizon, skewing to the target, centering by plate solving and syncing to the scope, starting guiding, taking repeated images while periodically checking centering and guiding, and continuing until a time or target drops below customized horizon.
Guiding Software
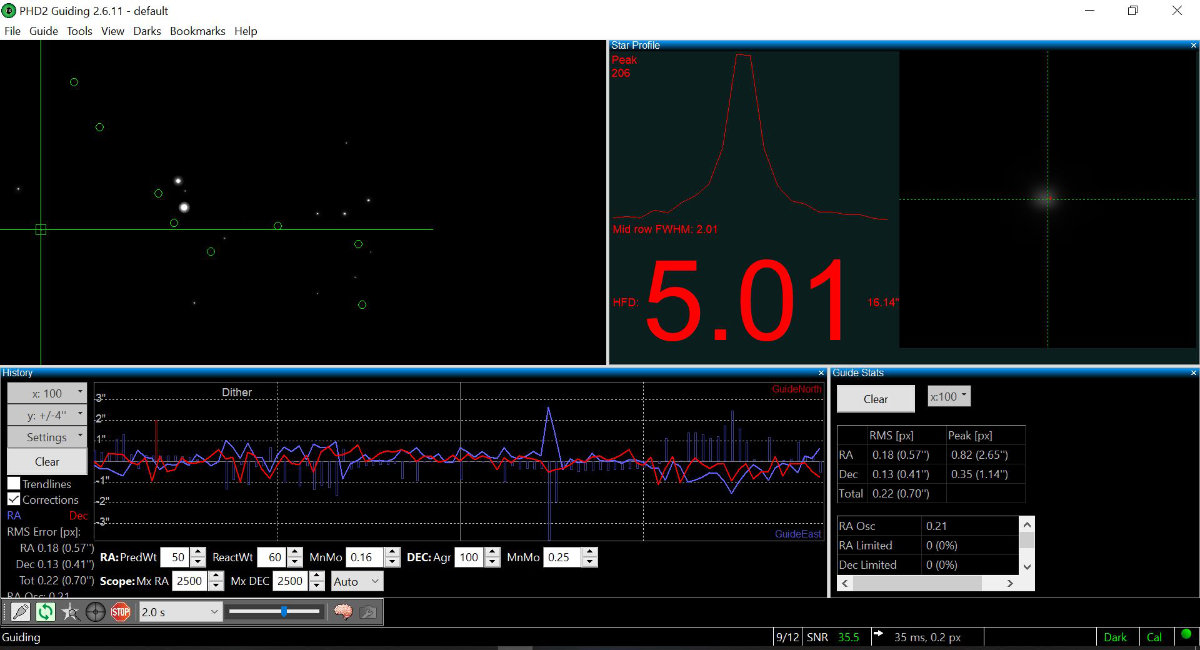
The guiding software handles the real-time control of guiding. The use of Phd2 (acronym is for Push-Here-Dummy) is ubiquitous and for good reason. I have used it from the very start when I added guiding to my setup back in about May 2021. First, some utility functions are run so the software can figure out how much adjustment it needs to send to get the telescope to move a particular amount in each dimension (calibration). Another utility measures the "backlash" of one set of gears. Backlash is always present when there are gears: if you turn in one direction and then reverse direction, there will be a tiny period of time before the reverse has an effect because there is a small gap between the gear teeth. This is a miniscule period of delay but in mount tracking, microns matter. So the software attempts to measure and compensate for this.
Once calibrated, the software can start guiding. It picks a star to track and follows it. If the star "moves", Phd2 knows that the mount tracking slightly off. It then sends adjustment pulses to the mount in the two dimensions in restore the star to its expected location which actually means restoring the mount to exact tracking of the sky. To maximize the accuracy, it picks a star that is not saturated and then it tracks not the whole star but rather computes the centroid of the star and tracks that. The process works amazingly well. With my current CEM70 mount and guiding setup, I am able to achieve less than 1 arc-sec total error which is less than one pixel-width on my widefield setup (slightly more on my galaxy setup).
Processing Software
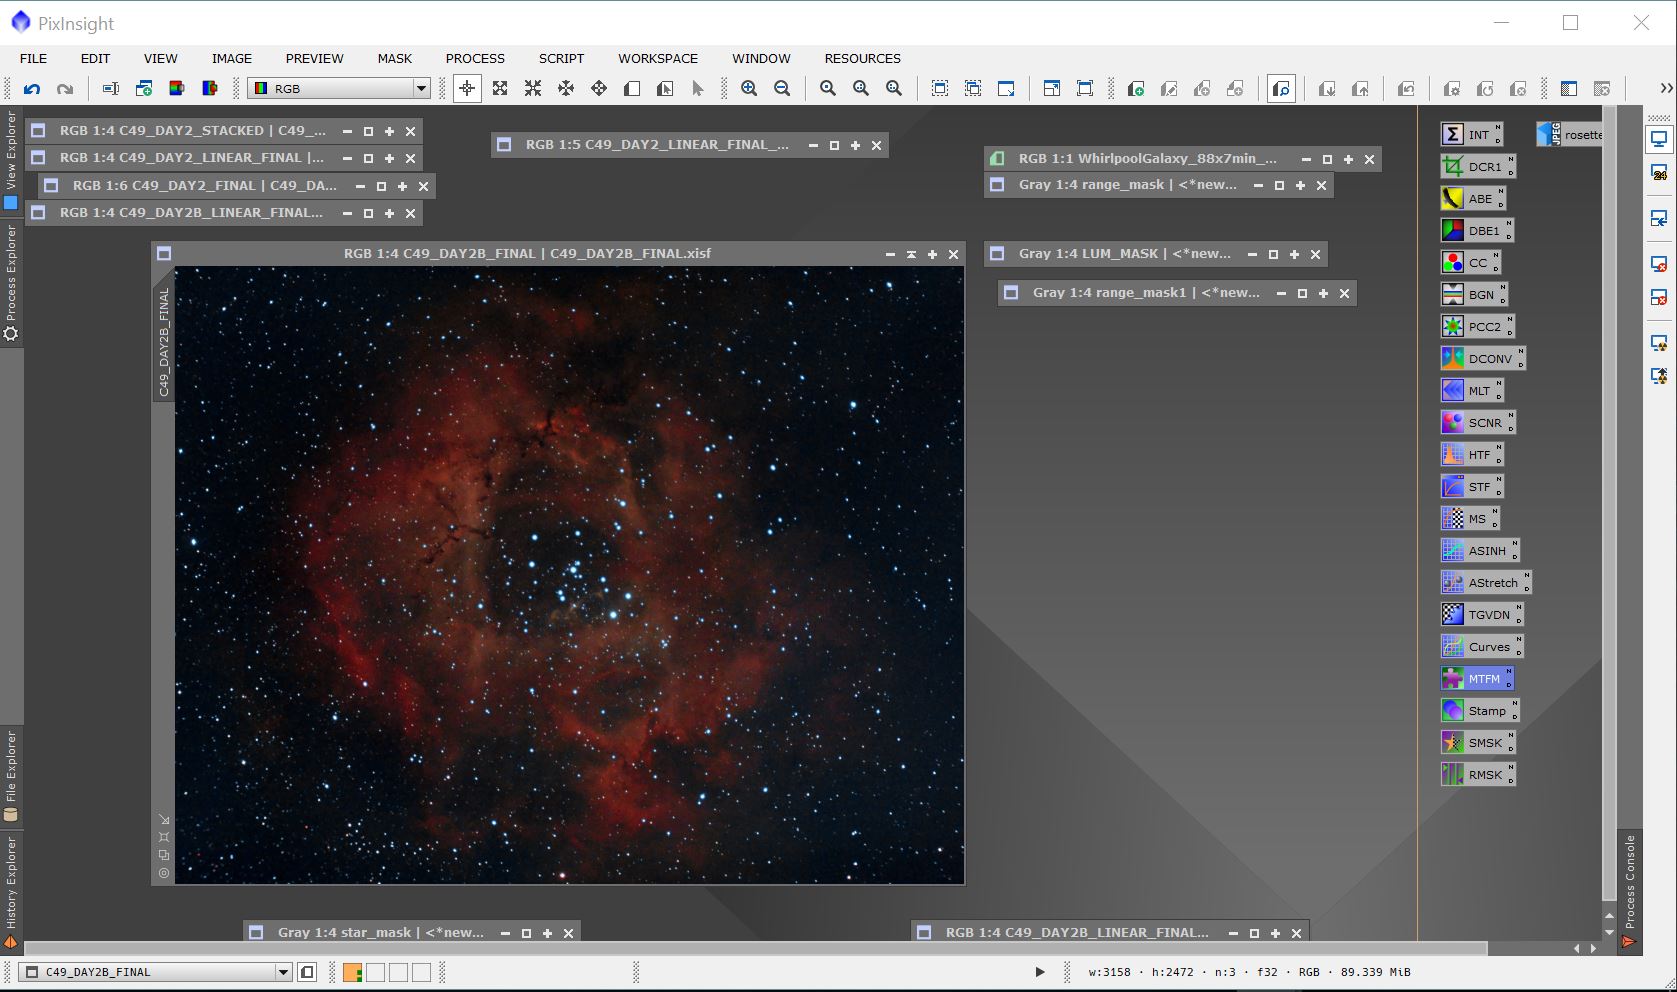
I use PixSight (PI) software for both the pre-processing and post-processing of the images since February 2021. In the pre-processing steps, the raw images are calibrated and registered. The calibration steps try to account for the physical realities of the sensor and telescope which causes noise and vignetting of the image. The registration steps align the images so that the stars are in the same spot in the image. Once this is in place, you can then "stack" all the images which essentially averages all the raw images. The benefit of this averaging is that it greatly increases the signal-to-noise ratio of the images that allows further processing. In the post-processing steps, the image is "pulled out". The starting image looks basically all black. The post-processing is what balances the color, stretches the image to bring out the constract, along with various noise reduction techniques to clean up the image.
There are a variety of software tools can be used for this pre-processing and post-processing. For the post-processing, the most widely known would be PhotoShop (PS). All of the post-processing done in astrophotography (AP) can be done in PS and indeed many AP'ers use it. For me, PI is specifically geared toward AP and since I wasn't familiar with PS to start with, jumping directly to PI was a better choice. For pre-processing, the calibration and stacking are essentially AP only processes and not used in typical photography, so all tools here are AP based. But there are several options here including the excellent free software Deep Sky Stacker (DSS). I initially started with DSS but once I bought PI, since it includes pre-processing, I do it all with PI.